Tuesday, September 29, 2015

Maybe Coconut Isn't So Bad?!?

For the longest time I have HATED coconut...I know, hate is a strong word, but the gritty texture and overly sweet flavor have always left me gagging, which has really bummed me out because there is nothing I love more than that beachy scent of coconut flavoring.  At the slightest smell of coconut I am instantly whisked away, in my mind of course, to an island paradise with a mai tai in hand basking in the sun and working on my non-existent tan.

But times, they are a changing!  Slowly, I have been introducing coconut into my life and it all started with these little gems...Girl Scout Samoas Cookies, and according to Little Brownie Bakers that makes me brainy, complex and mysterious! hehehe

Image courtesy of Little Brownie Bakers
and Girl Scouts of America
Seriously though, these cookies are A-MAZ-ING!  I began to wonder, maybe I do like coconut!  But I will NEVER, EVER, EVER, EVER like Almond Joy or Mounds EVER, EVER, EVER!! YUCK!

Now, if you have already been a long lover of coconut or even a recent convert like me, you will love this recipe by David Lebovitz, which I have adapted to include a huge short cut because let's face it, time is of the essence these days so if you need to cut a few corners to continue to enjoy homemade creations, I say do it!  I have taken a box cake mix from good to great by adding sour cream to make it moist and delicious and chocolate chips to pack a little extra chocolate punch.  You could also cut out the simple syrup step...not really necessary.  I also divided the original recipe between two 6" inch cake pans and 6 cupcakes instead of the two 9" inch cake pans because the cake is for my boss' birthday and the cupcakes are for the hubby (he would never forgive me for leaving him without his favorite dessert).

German Chocolate Cake (4 layers - 6")

German Chocolate Cake & Cupcakes!

Makes 2 – 6” cakes and 6 cupcakes or 2 – 9” cakes

For the cake:
1 box of chocolate cake mix
1 cup sour cream
1 cup chocolate chips

For the filling:
1 cup heavy cream
1 cup sugar
3 large egg yolks
3 ounces butter, cut into small pieces
½ teaspoon salt
1 cup pecans, toasted and finely chopped
1 1/3 cups unsweetened coconut, toasted

For the syrup: (I did use this, but I may not next time - maybe too moist)
1 cup water
¾ cup sugar
2 tablespoons dark rum

For the chocolate icing: (Flavor is to die for!!)
8 ounces bittersweet or semisweet chocolate, chopped
2 tablespoons light corn syrup
1 ½ ounces unsalted butter
1 cup heavy cream

1.    Butter two 6-inch cake pans, then line the bottoms with rounds of parchment or dust with cocoa powder. Line 6 cupcake/muffin tins with cupcake liners.  (Or butter two 9-inch cake pans, then line the bottoms with rounds of parchment or dust with cocoa powder) Preheat the oven to 350°.

2.    Mix the cake baker according to the directions on the box and add in the sour cream.

3.    Divide the batter into the 2 prepared cake pans and cupcake tin, smooth the tops, and bake for:

  • About 28 minutes for 6” cakes or until a toothpick inserted into the center comes out clean.
  • About 19 minutes for the cupcakes or until a toothpick inserted into the center comes out clean.
  •  About 45 minutes for 9” cakes, until a toothpick inserted into the center comes out clean.
Cool cake layers and cupcakes completely.
While the cakes are baking and cooling, make the filling, syrup, and icing.

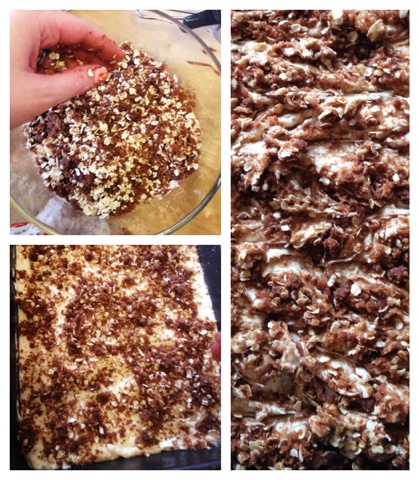
To make the filling:
1.    Mix the cream, sugar, and egg yolks in a medium saucepan. Put the 3 ounces butter, salt, toasted coconut, and pecan pieces in a large bowl.

2.    Heat the cream mixture and cook, stirring constantly (scraping the bottom as you stir) until the mixture begins to thicken and coats the spoon (an instant-read thermometer will read 170°.)

3.    Pour the hot custard immediately into the pecan-coconut mixture and stir until the butter is melted. Cool completely to room temperature. (It will thicken.)

To make the syrup:
1.    In a small saucepan, heat the sugar and water until the sugar has melted. Remove from heat and stir in the dark rum.

To make the icing:
1.    Place the 8 ounces of chopped chocolate in a bowl with the corn syrup and 1 ½ ounces of butter.
2.    Heat the cream until it just begins to boil. Remove from heat and pour over the chocolate. Let stand one minute, then stir until smooth. Let sit until room temperature.

To assemble the cake:
Remove the cake layers from the pans and cut both cake layers in half horizontally, using a serrated bread knife.
Set the first cake layer on a cake plate. Brush well with syrup. Spread some of the coconut filling over the cake layer, making sure to reach to the edges. Set another cake layer on top.
Repeat, using the syrup to brush each cake layer and spreading the coconut filling over each layer, including the top.
Ice the sides with the chocolate icing, then pipe a decorative border of chocolate icing around the top, encircling the coconut topping.

To assemble the cupcakes:
Using a paring knife remove a portion of the center of each cupcake and fill the holes with a generous amount of the coconut filling creating a mound in the center of the cupcake.  Then, pipe a decorative border of chocolate icing around the top, encircling the coconut topping.

Please enjoy and left me know if you try this out or how you feel about coconut!

Happy Baking,
Dani

Tuesday, September 22, 2015

Customize Your Kitchenaid!!

Check out my BEAUTIFUL, ONE OF A KIND, and OUT OF THIS WORLD Kitchenaid Stand Mixer, which was previously just a simple white, but has been transformed by Casey at Headcase Kustom Art to a stunning shade of purple with sparkly metal flake, silver leaf and lavender pinstriping adorned with my blog name.   I am floored by his work and couldn't be happier with how it turned out.  Now and forever I will have a working work of art that I will happily pass down to my future little baker(s).
Paint by Headcase Kustom Art
He works with customers all across the country (USA) and can work with you to create a piece that you will love and cherish for a very reasonable price.  You can check out his other works on his Instagram page or his website or you can contact him directly at headcase_220@yahoo.com

Happy Baking!!
Dani


Wednesday, September 16, 2015

Honey Graham Cracker Cake with Toasted Meringue Frosting

Honey Graham Cracker Cake
with Toasted Meringue Frosting
If you haven't heard about Food52.com by now, please, let me introduce you to an amazing site for all things sweet and savory.  A real foodie's happy place with articles, recipes and contests.  I often daydream about working there and developing and testing recipes all day, but since their offices are on the other side of the country I guess I will just have to continue to daydream...boo hoo!

Anyways, I digress, recently I found a terrific article by Posie Harwood that made me drool instantly. She discovered an old recipe from Nabisco that used graham crackers in place of AP flour to make a deliciously moist cake that actually tastes just like graham crackers!!  I was so excited and I knew right away I wanted to make a cake reminiscent of campfire s'mores and this is what I came up with and it was so easy! A Honey Graham Cracker cake with Jello Instant Chocolate Pudding filling and toasted Swiss Meringue frosting, which is Sweetapolita's Swiss Meringue Buttercream without the butter...yum!

Graham Cracker Cake
Adapted from Food52.com
·         1/2 cup all-purpose flour
·         1 1/2 cups graham cracker crumbs (from about 20 squares)
·         2 1/2 teaspoons baking powder
·         1/2 cup unsalted butter, softened
·         3/4 cup sugar
·         eggs
·         teaspoon vanilla extract
·         3/4 cup milk
1.      Preheat oven to 350° F. Grease two 8-inch round cake pans and line the bottoms with parchment.
2.      In a small bowl, whisk together the flour, graham cracker crumbs, and baking powder and set aside.
3.      In a large bowl or the bowl of a stand mixer, cream together the butter and sugar until pale and fluffy.
4.      Add the eggs, one at a time, beating between each addition.
5.      Mix in the vanilla.
6.      Add the flour mixture and the milk a little bit at a time, alternating between each. Mix thoroughly but be careful not to overbeat.
7.      Divide the batter evenly between your two prepared pans. Bake for about 25 minutes (or until golden brown and starting to pull away from the sides of the pans).
8.      Cool in the pans for at least 15 minutes, then turn out onto a rack to cool completely before frosting and assembling.
Honey Graham Cracker Cake Mise en Place
Chocolate Pudding Filling
Adapted from Jello Instant Chocolate Pudding
·         1 - 3.9 oz box Jello Instant Chocolate Pudding
·         cups cold milk
1.      Beat together pudding mix and cold milk for about 2 minutes (pudding will be soft set)
2.      Refrigerate until ready to use as filling
     **NOTE: One box makes way more filling than you need so you will have extra for dessert or a sweet snack!
Chocolate Pudding Filling
Swiss Meringue
·        5 large, fresh egg whites (150 g)
·        1 ¼ cups (250 g) sugar
·        2 tsp vanilla
·        Pinch of salt
1.      Wipe the bowl of an electric mixer with a paper towel and lemon juice to remove any trace of grease.  Add egg whites and sugar and simmer over a pot of water (not boiling), whisking constantly, but gently until the temperature reaches 140°F, or if you don’t have a candy thermometer, until the sugar has completely dissolved and the egg whites are hot.  Remove from the heat.
2.      With the whisk attachment of the mixer, begin to whip until the meringue is thick, glossy and the bottom of the bowl feels neutral to the touch (about 10 minutes of whipping).
3.      Add the vanilla and salt and whip until incorporated...that’s it!!
Whipping & Toasting
of the Swiss Meringue
TO ASSEMBLE: Place one cake layer on a plate or cake stand and pipe a ring or dam of meringue around the edge of the cake to keep your pudding filling from spilling out.  Then, fill the inside of the the piping ring with your chocolate pudding.  Take the second cake layer and carefully place it on top of the first layer.  Then, using an offset spatula slather the remaining meringue all over the cake using short strokes to create waves and peaks.  Lastly, and this is the fun part, using a small kitchen torch start toasting the meringue, but be careful because the meringue can easily burn.

I was a little nervous that the cake would turn out dry from the graham cracker crumbs, but it was so moist and light.  Posie Harwood was so right!  Plus, the chocolate pudding added the perfect amount of moisture to the center of the cake while the meringue frosting was like a sweet cloud that tasted just like toasted marshmallows.  A perfect cake to take to a potluck or to keep for yourself!  Give this recipe a try and I promise you will not be disappointed!!
Moist, Tender & Toasty!
Happy Baking!!
xoxo,
Dani

Sunday, September 6, 2015

GF Dark Chocolate Cherry Cake

When I signed up for my Escoffier Online Healthy Baking course I was really excited to find ways to create desserts that people with restrictive diets could enjoy, but also feel like they weren't eating diet food.  It also hit close to home for me because my dad must follow a diabetic and renal (kidney) friendly diet so I know first hand how important the ingredients can be to how a person feels. 

This weekend I got to hang out with my dad and it was the perfect opportunity for me to make him something special that wouldn't spike his blood sugar levels or put any unnecessary strain on his kidneys, but that also tasted great to the rest of my family who are lucky enough to not have to worry about what they are eating.  I think this recipe did the trick.

Since the texture of my baked goods have been so delicious with my gluten free flour blend I thought I would make some substitutions in this recipe and see how they worked out.
GF Dark Chocolate Cherry Cake
Adapted from DaVita.com

Ingredients

  • 1/2 cup unsalted butter 
  • 2 eggs 
  • 1/2 cup Truvia or 1 cup granulated sugar 
  • 1 cup of Greek yogurt or sour cream 
  • 1 teaspoon vanilla (almond would be nice too)
  • 2 cups gluten free flour blend or all-purpose white flour 
  • 1 teaspoon baking powder 
  • 1 teaspoon baking soda 
  • 20 ounces cherry pie filling or any other filling flavor
  • 1/2 cup dark chocolate chips (or sliced almonds for texture)
  • Tub of light Cool Whip Topping

Preparation


  1. Preheat oven to 350° F. Set butter out at room temperature to soften. 
  2. Using a mixer, blend butter, eggs, sugar, greek yogurt and vanilla together. 
  3. In separate bowl sift together flour, baking powder and baking soda. 
  4. Add dry ingredients to the butter mixture and mix until just incorporated trying not to over mix. Spread batter into a greased 9" x 13" baking pan. 
  5. Evenly disperse cherry pie filling over batter and sprinkle with dark chocolate chips. 
  6. Bake for 40 minutes or until golden brown and tooth pick inserted in the center comes out with little to zero crumbs. When serving put a dollop of Cool Whip Topping on top of each piece. 

    *NOTE: The batter is thick and sticky...don't worry...just spread it out as evenly as you can in your dish (I used two spoons)...it will bake up beautifully!!

    Mise en Place
    Cherries and more Cherries
    Golden Delicious
This cake turned out really great. It was light, moist and had just the right amount of sweetness from the cherries and chocolate. A perfect treat for a warm summer evening or a Labor Day potluck. 

If you are not worried about your sugar intake I may suggest using regular sugar rather than the sugar substitute because it can leave a slight after taste that I just can't put my finger on...it's not bad, but it's different.  Otherwise I was really happy with the flavor and the Greek yogurt was a great substitution for the sour cream because it gave the dish an extra punch of protein.

Please enjoy and let me know what you think!

Happy Labor Day and Happy Baking,
Dani

Tuesday, August 25, 2015

Gluten Free Banana Bread

Oh, the banana...such an underrated fruit.  All too often they sit on our counters, lonely and green with envy as the apples and berries have all the fun being used for more than just a quick breakfast on our way to work, but then, in the blink of an eye, our beautiful canary yellow bananas turn a potting soil brown. I know, sounds appetizing, but I beg you to resist the urge to throw out those bananas with the old coffee grounds. Instead, throw them into the freezer until you are ready to use them because what was old and brown can become new again, and sweet!

Gluten Free Banana Bread
Bananas past their so called peak of freshness can be used for all sorts of tasty treats such as one ingredient banana "ice cream" (slice them up, freeze, then blend to a soft serve consistency and you've got an amazing way to beat the summer heat); or, two ingredient banana pancakes (one banana mashed with 1-2 eggs lightly beaten and cook as you would any other pancake and you have a delicious breakfast for your toddler or hungry spouse). 

Personally, my favorite use for my ripe bananas is a good old fashion loaf of banana bread because the flavor never disappoints and goes great with my morning coffee or latte. There is just something so nostalgic about banana bread. I guess it reminds me of holiday mornings surrounded by my family; hanging out in our pjs and laughing about one thing or another.

This fabulous recipe was adapted from Hoosier Homemade's "Best Ever Banana Bread" was converted to a gluten free version for my school assignment and I have to say, it is one of the best banana breads I have ever eaten. It is all that you want a banana bread to be: soft, moist, slightly sweet and full of banana flavor, which you can thank those potting soil brown bananas for!!

Ingredients (makes 1 standard loaf)
2c MINUS 2tbsp GF Flour Blend**
1c sugar
1tsp GF baking soda
1/2 tsp salt
1/2c GF Wesson Vegetable Oil (Soybean oil)
2 eggs (lightly beaten)
3 very ripe bananas, mashed
1tsp GF vanilla
Add 1/2c walnuts, chopped if your nuts are free of gluten ingredients
**See my post on my go to GF Flour Blend

Method 
Preheat oven to 350 degrees and prep 1 standard bread pan with GF non-stick spray.  In a large bowl, sift together dry ingredients and set aside.  In medium bowl, mash bananas, add eggs, vanilla and oil. Make a well in the center of the dry ingredients and pour wet ingredients into well.  Fold wet ingredients into the dry ingredients until just combined.  Pour batter into prepared pan and bake for 50-60 minutes or until golden brown and a toothpick inserted into the center of the loaf only has a few crumbs.
Mise en place
Sift, Mash and Fold
Bake to Perfection
This bread was so delicious and once again my GF Flour Blend did not disappoint. I can't tell you how excited I was to see the height of the loaf through the oven window as it baked up because I had always been unable to achieve that kind of lift with other GF recipes.  You will love this loaf and if you don't want to make the leap to gluten free, I am sure that the original version is just as yummy so give it a try.
If you need to be strict on your gluten intake please be careful when choosing your ingredients.  I was very close to following the original recipe and adding walnuts, but when I looked at the ingredients on the walnut bag I noticed that they were produced with trace amounts of wheat, which is a no-no for gluten free eaters.  The same is true of baking powder and even vanilla so read the ingredients list closely!  If you need some extra help on deciphering whether the item is gluten free or need some options, head over to GF Overflow to check their database.
Please enjoy and let me know who you think. 
Happy baking!
~Dani

Monday, August 24, 2015

Flickr Online Baking Portfolio

Over time I have slowly been creating an online Flickr Baking Portfolio that I would like to share with you. It has a little of this, and a little of that, but most of all it is a fun collection that shows how my baking chops continue to progress.

Here are a few of my latest cakes that I am really proud of that are included in my Flickr Baking Portfolio:
Rockin Rio
 6" - 4 Layer Vanilla Bean Cake
Meyer Lemon and Strawberry Curd
Vanilla Swiss Meringue Buttercream
Strawberry Scented White Chocolate Shards & White Chocolate Drip
Rainbow Sherbet
6" - 4 Layer Vanilla Cake
Meyer Lemon Curd and Strawberry Preserves
Ombre Vanilla Swiss Meringue Buttercream
Peanut Butter & Jelly
6" - 5 Layer Chocolate Cake
Chocolate Peanut Butter Buttercream with Strawberry Preserves
Chocolate Cake Orbs with Rainbow Confetti
Cookies 'n Cream
6" - 4 Layer Chocolate Cake
Cookies 'n Cream Cookie White Chocolate Buttercream
Carrot Cake
8" - 3 Layer Carrot Cake
Cream Cheese Frosting & Toasted Walnuts
Strawberry Cheese Cake
9" - New York Style Cheese Cake
Fresh Strawberries and Fresh Whipped Cream
Thank you for your continued support and I welcome any feedback. 

Happy Baking,
~Dani

Sunday, August 23, 2015

GF Cinnamon Oat Streusel Cake

Never in a million years would I have ever thought that these words would come out of my mouth, but this gluten free coffee cake is better than any I've had before. I thought that I would immediately be able to tell that this cake was made without AP flour and that it would taste dense, dry and gritty, but the truth is that those worries couldn't be further from the truth.

This cake is moist, fluffy and light.  The crumb is tender with the perfect amount of chew. It's so light in fact that you will be tempted to go back for seconds and even thirds! My husband, who is picky about his sweets had no clue it was gluten free nor did he care once he found out.
This cake is also a great base for different flavors such as the addition of berries and nuts, but be careful with nuts if you need to be strict about it staying gluten free since a lot of nuts are processed where wheat and other gluten contaminated products are processed. 
Cake
1c butter (softened)
2 eggs (lightly beaten)
1 1/2c sugar
1c milk (room temp)
3c sifted GF Flour Blend**
4tsp baking powder
2tsp salt

Streusel Topping
1c brown sugar
4tsp cinnamon
1/4-1/2c rolled oats
3-4tbsp melted butter
**See my post on my go to GF Flour Blend
Method
Preheat oven to 350 degrees and grease a 13x9 pan and set aside. Cream together butter, eggs and sugar. Stir in milk. Fold in sifted dry ingredients and set aside batter. Prep streusel by combining all ingredients with a fork. Pour half of cake batter into your greased 13x9 pan. Sprinkle 1/2 of streusel over batter. Top pour remaining batter over streusel layer then sprinkle remaining streusel over batter. Bake for 35-40 min or until golden brown. A toothpick inserted into center should give a few crumbs.
Mise en place
Creaming and folding
Streusel and layering
Enjoy and please let me know what you think! Up next, a delicious gluten free banana bread. 

Happy baking, 
~Dani